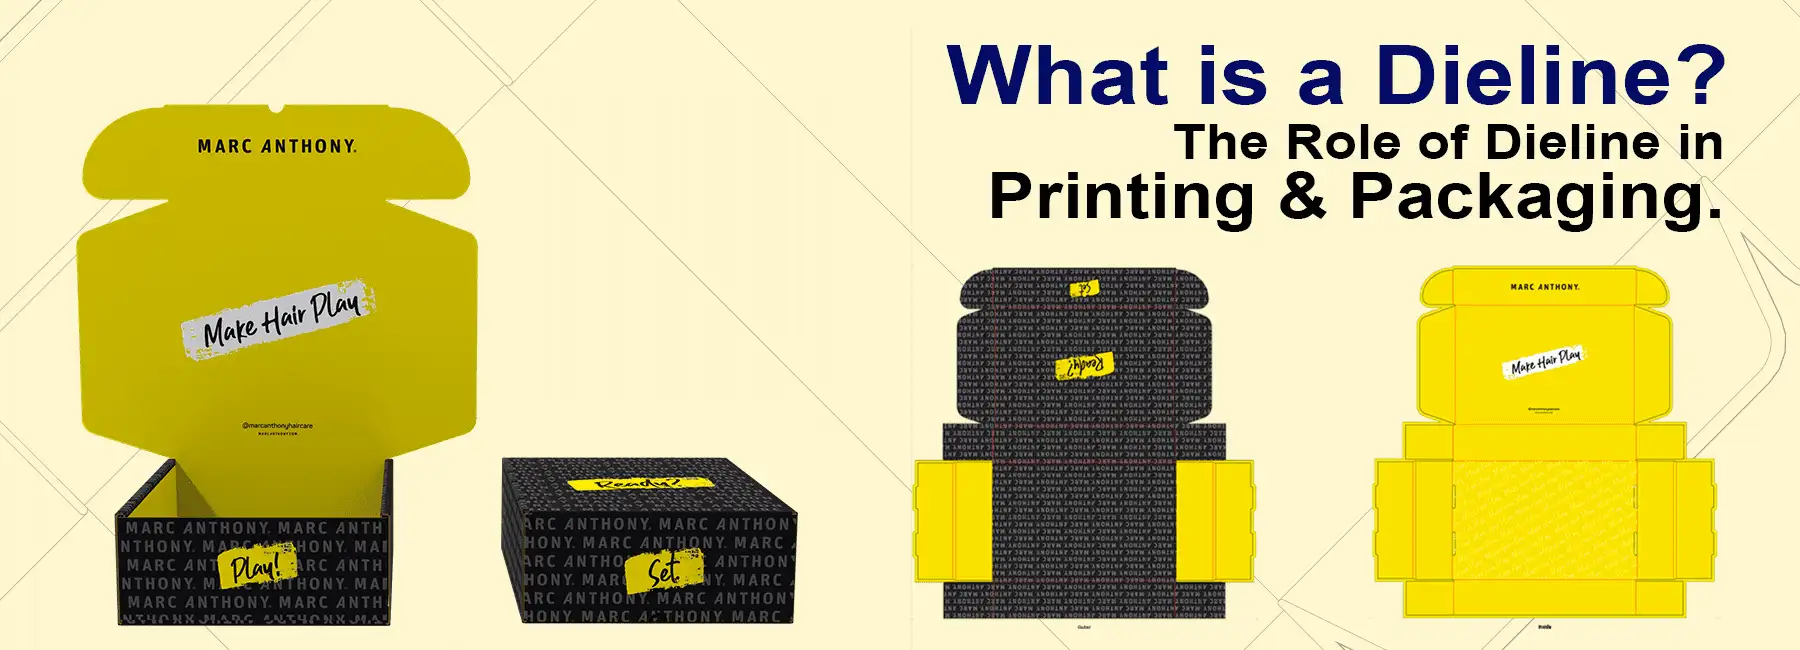
Die Lines are a set of markings that guide the cut, fold, and perforation processes in box manufacturing. They lay the plan that allows a 2D print to be assembled into the desired packaging for your product. Let’s find out more about die lines in this article.
Importance of Die Line in Printing and Packaging
Accuracy and Consistency are critical in any manufacturing process but even more so within the printing and packaging operations where achieving the precise placement of the design, box components and brand elements can seriously impact wastage and therefore financial loss and/or decline in the final look and feel of the package. A brand whose box with uneven print or dimensions does not convey class and quality to the customers regardless of how good the product inside might be.
Enter die lines to the rescue!
We have combined all the key information about a packaging die-line in the article below which is structured as follows:
- Importance of Die Lines in Printing and Packaging
- Components of a Die-Line
- How to Ensure the Creation of Precise but User-friendly die lines
- Pro-tips for Setting up a Precise and User-friendly Die Line
A die line can take any shape or size but a few examples of what it might look like are shown below:
They signify the end of the box planning process and the start of the manufacturing process. We believe that the quality of the die line is a direct reflection of the quality of communication and understanding between the client and the packaging partner and this is exactly why The Mailer Box invests both money and time into understanding customers’ requirements and then developing the die lines.
A packaging die line is essentially a template that outlines where the material will be cut, creased, and folded to create the desired packaging. This contributes by:
Facilitating the Design Realization Process
Die lines allow all stakeholders to visualize how their artwork will translate into the final product. They also provide designers with the flexibility to experiment with innovative shapes and interactive elements for unique user experiences.
Ensuring Precision and Consistency
Die lines act as a blueprint in printing and package manufacturing. With this blueprint fed into the industrial die cutters, the manufacturers can be significantly sure of precision and consistency across the production run. This feature is extremely critical in mass production.
Enhancing production efficiency
Without precise die lines, there is a risk of misalignment, misfolding, or improper assembly, compromising the overall aesthetic and functionality of the packaging. By providing clear guidelines on where cuts should be made, how folds should be executed, and what adhesives should be used where necessary, die lines streamline production processes while guaranteeing that every package meets quality standards. This automatically reduces the load on the quality assurance and mistake correction processes thereby improving your supply chain’s efficiency and dependability.
Components of a Die Line

1) Cutting / Trim Lines
It is the outline that defines the final shape of the product by indicating where the material will be completely cut from, including any internal cut-outs.
Usage: The die lines instruct the manufacturer where to cut the material from, to achieve the gross flat shape.

2) Folding / Creasing / Scoring Lines
These appear as indentations or shallow cuts in the material that allow the flat material to be folded easily into a container without damage.
Usage: Folds, creases, or scores inform the box assembler where to correctly bend or fold the box.

3) Perforation Lines
Dashed or dotted lines that indicate where the material should be perforated from. Often used in mailing items with security or signature requirements.
Usage: Perforation lines create tear-off sections in a box by weakening the packaging material through dots or dashes. End customers can tear these lines with minimal effort and gain easy access to the products inside without the need of scissors or cutters.

The extra margin or the extended printing beyond the cutting lines.
Usage: Bleed ensures that no edges are left unprinted due to human errors or slight misalignments during the cutting processes

4) Safety Margins
Margins or safe areas inside the cutting lines where no critical design elements should be placed
Usage: These ensure that the critical design elements (such as the logo or text) are not too close to the edge and are not trimmed off during cutting
5) Registration Marks
Small symbols for communication between the designer and printer that convey how to accurately align the material. These are placed outside the cut area but within the bleed
Usage: These direct the precise alignment for multi-layered printing and cutting
Creating Effective Die lines
This has to go without saying but the importance of effectively understanding the product requirements cannot be overstated. This involves incorporating the product requirements into die line design and involves careful consideration of factors such as structural support, branding elements, and consumer convenience.
Your brand team can have an in-depth knowledge of the products but ensuring the product fits its container, both in terms of dimensions and functionality, is another story altogether and requires a specialized set of skills, experience, and tools. The Mailer Box takes this into account by having a dedicated team of packaging experts available for its global clientele 24/7. Your packaging partner must never rush to production or even die-line development without comprehensively understanding what the brand, product, and supply chain requirements are.
Once an integral understanding is achieved, the next step is to transfer that knowledge through the correct specialized software. An effective die line should be designed using vector-based software. Some of the frequently used and powerful software include Adobe Illustrator, CorelDraw, and AutoCAD. The Mailer Box has partnered with Pacdora, one of the most specialized and reliable packaging design software in the industry that enables the user to see the translation of their die line into a 3D mockup. This AI-powered tool brings the die line and design idea as closely to reality as possible.
Pacdora 3d mockup view

Pacdora die line view

Next, finalize the document with each type of line and finalize it for sharing.
You can also read more about how to create an effective die line along with a real-life packaging example here.
Pro Tips for Setting Up Precise and User-Friendly Die Lines
Three decades of printing and packaging have taught us some key points that help in developing precise and user-friendly die lines.
First of all, you need to understand the material you are working with. There is a wide variety of packaging materials available in the market (including but not limited to paper, cardboard, and plastic) and each behaves differently in cutting, folding or perforating. Having a clear end goal in mind along with an understanding of the selected packaging material ensures that there are no surprises when assembling the final box. You can find more about how different materials react to different processes here.
Secondly, invest in the right tools and software. These are resources that provide creative flexibility and minimize the chances of error. These specialized tools also facilitate communication between the client and the packaging partner. Take a step further and continue to stay updated on the relevant technologies.
Thirdly, develop and closely follow a consistent color-coding system for the die lines. Each line needs to be clearly labelled simply because you don’t want the manufacturer to cut what you want your customer to see on the box.
Next, even after adopting a consistent color coding system, it would be valuable to include detailed labels and instructions for the manufacturing as well as the assembly of the box. This would make crucial aspects easier for the user to understand.
Finally, prototyping and testing for manufacturing would allow you and the end customer to test the design and structural integrity of the box. Wherever possible, convert the die line into prototypes for real-world testing. These can identify practical issues with the box that might not be obvious in the digital or even the physical but unused design.
If you gained something from reading this article, please do give it a thumbs up!


